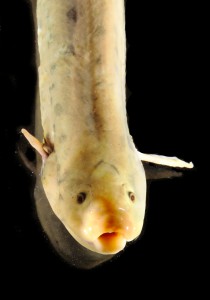
To deliver my promised photography took several steps. First, I set up a time to meet her to see the environment where I would be working. She showed me her lab, and we discussed what she wanted to show in the photos. This is a critical part. If I do not understand what is important, I cannot ensure that the photo shows it. In this case, the primary subject is the fish, and the fact that they come to the surface to breathe. Secondarily, I would take photos of her and her postdoc doing work with them.
While I have photographed through water in the past, this is not a type of photo that I normally take. I spent a few hours reading on the Internet about how to take photos of fish. The biggest problem is chromatic aberration caused by the light going across the air/glass, glass/water and air/water boundaries. This causes color fringes on the edges of things like the fish. It also causes the image to be fuzzy, because the different colors come to a focus at different places, some in front of, some on, and some behind the camera sensor. I am glad that I did this research, because I was aware of the problem and the solution—keep the sensor parallel to the glass or water surface.
For the actual photography, I showed up with a full studio’s worth of lighting equipment. It actually ended up being relatively simple, with two radio-slaved flashes (speedlights or speedlites depending on your camera maker). I put the flashes on simple stands on the table so their light came in from two sides of the aquarium which was also on the table. Because the table was more-or-less white, we put the aquarium on a piece of black foam-core, and we put another piece behind the aquarium. This way, I could get a black background for the photos. When we did the photos showing people working with the fish, I did set up a pair of softboxes on light stands to have some nice soft light to make the researchers look their best.


in the aquarium with the water already added. This guaranteed-gray card allows me to adjust the colors so they are correct in the final image. The really important thing for this photo shoot is that the card can be put into the water so the lighting conditions are identical to the fish photos. Not all color standards can handle this.

When we were done taking the photos (including a few of Dr. Salinas and her postdoc), I packed up and left. However, my work is not yet done.
The next task for me is to do photo processing. This means the following tasks:
- Doing the “best/rest” cut, where I decide what photos I am happy with, which need to be removed, and which are not my favorites, but I will keep them in case there is some need in the future. So far, the “rest” photos have been mainly useful when I give talks or teach photography classes. They can be a good example of what can go wrong with a photo. When paired with a good version, the difference is clear. However, I am brutal with the cut, and sometimes a photo that can be rescued with extra editing does a better job of showing the science. I therefore keep these photos in case the scientist needs them.
- Setting the white balance to be correct for all of the photos.
- Working from the raw file (not a JPEG), adjusting things such as levels, brightness, contrast, etc so that the photo shows what it needs to.
- When necessary, doing detailed fixes using the GIMP. In this case, I removed the dust from some of the photos. I normally work really hard to get the photo right in the camera and keep the amount of this type of editing to a minimum. This editing can easily end up taking a lot of time. Given that my donation was for only a half-day of total time, I have little room for lots of editing.
- Uploading the photos to a password-protected, non-public customer download area on my web site, and then sending email to Dr. Salinas to let her know that the photos are ready for her.
This completes the work for a science-in-action photo set (science photography). If the researcher has given her or his permission, the only step remaining is to update my web site and/or blog with an example of some of my latest work. You can see a finished photo of a lungfish at the top of this blog posting.