On-camera Lighting

On-camera lighting has been bashed, with good reason, by photographers for years. However, it is not always bad. Here are a few of my thoughts about and experiences with it.

Introduction

On-camera lighting refers to a built-in flash or a hot-shoe mounted flash, often called a Speedlight (Nikon) or Speedlite (Canon, Ricoh). This means that the light source is relatively close to the lens.

With the light source close to the lens, this means that there are few shadows, and what shadows there are tend to be small.

Disadvantages

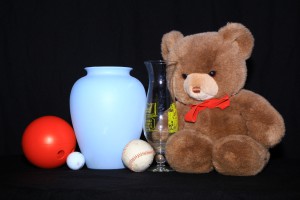
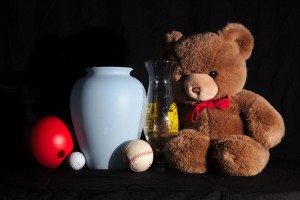
Because of the few and small shadows, everything in the photo looks flat. Shadows show the shape of objects when all you have to work with is two dimensions as opposed to three. For example:

Still life lit with on-camera lighting with three balls, two vases, and a Teddy bear. There are nearly no shadows.
With on-camera lighting, there are few shadows and everything looks flat.

Front-45 degree lighting for a still life with three balls, two vases, and a Teddy bear. Shadows show the shape of objects.
With a light source to the right of the camera, you can see the shape of the objects.

When taking photos of people, on-camera light often results in what is knwon as “red-eye”. This occurs when the flash bounces off of the retina and back to the camera. People tend to look like some kind of alien with a glowing eye. I will have to go create one of these to give as an example.

On-camera lighting used in lower-light situations tends to produce images that have a dark or black background. This is fine if it is what you want, but it can be distracting. I will have to go create one of these to give as an example.

Advantages

On-camera lighting is not completely bad though. It can be used to fill shadows. For example, on a sunny day, you can have your subject facing the sun. This is great for lighting their face, but will make them squint. Instead, turn them around so the sun is behind them. Then turn the flash on. Here are a pair of examples of using front lighting to fill shadows:

Woman with a rose near her head, with on-camera lighting balancing the natural light to fill shadows
This photo of the model Monica Duran shows using a fill flash to soften shadows. The flash was located on a bracket, so it was not in the hot shoe, but about a foot (30cm) away. The flash was set to approximately balance the sunlight which was the other light source for this photo.

woman on rocks with a wave crashing in the background with shadows filled by on-camera lighting
The lovely Monica Moya near a heart made of white coral stones at South Point on the island of Hawaii. Because the sun was setting behind her, I used a flash mounted on a bracket to fill the shadows that would have been there.


As I mentioned above, I tend to use a flash bracket when I want to use front light. My bracket is a Alzo Flip Flash Bracket. They claim it is for Canon cameras, but I see nothing in its construction that makes it Canon-specific. This bracket is heavy, but very versatile. It moves the front light source enough away from the lens to avoid red eye, but it is still close enough to fill the shadows.

Conclusions

On-camera lighting has a well-deserved reputation for making photos look boring and flat. However, it can be useful, when properly balanced with other light sources (a separate blog posting), to fill shadows. Don’t give up on it, but do consider getting a flash bracket to move it far enough away to avoid red eye.

Continuous lights

One option for lighting is continuous lights. These sources of illumination, as their name implies, provide light all the time, as compared with flashes, strobes, speedlights, and/or speedlites with their short burst of light. Continuous lights, like all lighting options, have advantages and disadvantages. The big advantage is the ability to see the effects of the light that illuminates your subject(s). You can set the light direction, character, and relative intensity to what you want, and see that it is correct. In this blog posting, I will talk about my experiences with continuous lights, and their individual pluses and minuses.

Hot lights

In times past, photographers used what were called “hot lights”. These were either high-power incandescent bulbs or one or more banks of them. Due to the technology of incandescent lights, they generate as much or more heat as they do light, hence their name. Some people use lower-priced work lights, similar to what you can get from hardware stores. For example, here is a twin-halogen light on a stand.

The primary difference between something like this and lights designed for photography is that these lights have no built-in support for light modification devices such as soft boxes, flags, grids, etc. They are also not dimmable, so you have to control the intensity by moving them closer or farther away from the subject. Photographic hot lights tend to be more flexible in how you can use them, but you pay more for this capability. For example, this light set uses 600W halogens, and comes with light stands, soft boxes, barn doors, and an umbrella. While there is not a dimmer included, en electrically-minded person could add one for not lots of additional cost.

Hot lights are not very expensive (unless you count the electricity it takes to run them), they provide a lot of light, and they will probably heat your studio at the same time. Not too bad a deal if you are shooting in the winter, but electric heat tends to be one of the more expensive ways of heating. In fact, hot lights are often so hot that you can get a serious burn from reflectors and other modification devices, and they can start fires if something flammable gets too close to them. Because newer technologies are better in terms of power consumption and safety, these types of continuous lights are used less often.

Fluorescent lights

The next lighting technology after incandescent was fluorescent. Early continuous lights of this type were often shunned by photographers due to their poor color characteristics. However, technology improved and the color properties became much better (but at a higher price). Again, some photographers went to a hardware store and purchased inexpensive fixtures and the more expensive daylight-balanced bulbs and created low-cost continuous light sources. Others used more photographically-designed lights.

Fluorescent lights are inexpensive—they are similar in cost to hot lights. They are also far cooler and much more efficient. However, only rarely are they dimmable, which means you control the intensity by changing the light-to-subject distance or the number of lights you are using.

LED arrays

The current lighting technology for continuous lights is light-emitting diodes (LEDs). They are cool and the most efficient form of generating light in common use today. An interesting phenomenon is that they are often combined into arrays that can provide softer light than a small point source. Prices range from inexpensive to jaw-droppingly expensive. They are usually dimmable, and the more expensive ones even have color temperature adjustments.

My personal experience with LED arrays for lighting is that they are inexpensive, flexible, and not very bright compared with the other lights I normally use (studio flashes or speedlights/speedlites). I own two 160-LED arrays and one 500-LED array. The larger array has built-in barn doors for some control of the light. I like that all of them can be battery-operated for several hours. They seem bright until I meter the image. Because I shoot at low ISO settings for image quality (I aim for images that will print well at 2x3ft), my lights do not produce sufficient illumination for hand-held shutter speeds. I could fix this by purchasing more expensive lights, but I tend to use flashes instead.

White balance

I have previously written about white balance, so I will only say here that it is critical to getting accurate color in your resulting photos.

When purchasing a continuous light source for color work, one measure of color quality is to look at the color-rendering index (CRI) which measures how accurate colors will appear to a human eye. This number tells you how well the light source does at accurately rendering color when compared to a standardized daylight (a value of 100). Lower numbers are progressively worse, and some light sources (such as low-pressure sodium lights) have negative CRI values.

The other measure of color is the color temperature, measured as a temperature in degrees Kelvin. The lower the number, the redder the colors are.

Hot lights, in spite of their name tend to be cool (usually in the range of 2800 to 3500K color temperature). This makes them have more red, orange, and yellow tones when compared with daylight. However, because they have a continuous spectrum of light, they usually have a CRI of around 100.

Fluorescent lights have a well-deserved reputation for poor color rendition. These lights often have a light spectrum consisting of only a few spikes of a specific color. The location in the spectrum limits how accurately they can reproduce color for human eyes, and this is reflected in CRI values s low as 50. Better bulbs can approach a CRI of 90. Fluorescent color temperature is also controlled by the phosphors used in the bulb, and they range from around 3000 to 4000K.

LED light quality varies with the quality of the LED. Cheap ones can have poor color quality compared to the more expensive LED light sources. They tend to have a CRI in the range of 80, with the best coming in at 98 (example). More expensive arrays allow you to choose a color temperature.

Remember that mixing different light sources can make getting an accurate white balance difficult or impossible. Sshadows from one light source that are illuminated by another will have a color cast to them if the lights have different color temperatures.

Summary

The big win with continuous lights is the ability to see your lighting before you press the shutter. This means that you can know that it is correct. This knowledge can give you piece of mind. It will save time when setting up photos.

Continuous lights can be inexpensive, making them a good way of starting into lighting. However, when you get to light modification to control what is illuminated and the character of the light, you will find that the more expensive lights tend to have more options for control. Surprise, they are more expensive for a reason. How important this control is to you depends on the photos you take.
Proper exposure: Black, white, or gray?

What does your camera’s meter do with objects of different brightness? Unless you have an unusual camera, it probably tries to get the image to match the standard gray. Lets take a look at what this means in terms of getting the proper exposure for your image.

The problem

First, here are three images of different-brightness items, with true black and white references above. These were all three shot with the camera on automatic exposure mode, so it was picking what it believed was the “correct” exposure.

Black bar
White bar
A gray image (not the proper exposure), only slightly darker than the white posterboard image
A photo of black poster board (with a bit of a bend in it)
A gray image (not the proper exposure), only a little lighter than the black posterboard
A photo of white foam core board. It has a glossy surface, hence the reflected light source.
A WhiBal gray reference card with a proper exposure
A photo of a standard gray card
The camera made the black object gray. While slightly lighter than the black, this white object is gray. Unsurprisingly, the standard gray card (a WhiBal card) is gray.

Looking at the color values in the three images, the black object has RGB values around 155, or about 60%. The white object has RGB values around 180, or about 70%. The WhiBal gray card has RGB values around 155, which is again around 60%. Of the three items, only the gray card had the proper exposure.

What this means is that you need to be aware of the brightness of the items you take photos of. The correct exposure for an item is often not what the camera’s meter tells you. Here are some examples of how things can go wrong:

  • Take a picture of a snowy scene. The brightness of the snow and the sky will be reduced to gray tones when you want them to be at the top of the brightness possibilities.
  • Take a picture of a person with dark skin. The camera will brighten their skin, giving them lighter skin than they really have.
  • Animals that are black or white (e.g., a black cat or a polar bear) will end up more gray than their proper color.

Solutions

OK, so the camera’s meter can be fooled by your photo subject. What can you do about it?

The simplest solution is to use your camera’s exposure compensation controls (Canon, Nikon, Sony, Fuji) to brighten or darken the image and end up with a proper exposure—one that shows dark items as dark and/or light items as bright. Sometimes, this is what I do.

Other times, when I find myself needing more control over the image exposure, I will take more control. First, I have set my camera’s meter to be a spot meter. Not all cameras have this control over metering, but the more capable ones will. This means that I can look at the exposure that the camera is recommending for various parts of the scene I am going to photograph. My camera records 14 bits per color per pixel. For comparison, a normal JPEG image has 8 bits per color per pixel. I look at the various meter values to see if the camera can record the whole scene, from the dark areas to the light areas. If it can, I will set the exposure so that the image is properly exposed.

For example, suppose I was going to take a picture of a dark-skinned person sitting on the grass under a tree in an otherwise brightly-lit scene. I would take meter readings from: the person’s skin, the grass in shadow, the grass in the sun, the leaves on the tree, and the sky (if it was to be in the photo). If the difference in exposure between the darkest and lightest is within 8 to 10 EV, I would go ahead and take the picture. While my camera can record more than this, whenever you get close to the edges of camera capability, image quality is likely to suffer unless you are perfect in your exposure.

If the difference between the bright and dark areas of the scene is too much, I would have to use other techniques, such as adding a fill flash, using a reflector to bring in additional light to the dark areas, or using high dynamic range (HDR). Which of these (or other) alternatives is the correct approach depends on what I am taking a photo of and what additional equipment I have with me.

Another possible solution is to shoot RAW instead of JPEG. Many cameras allow you to capture the raw data from the image sensor, usually called a camera RAW image. If the contrast was not too great, then the camera might have data for detail in the shadows and highlights that might not have made it into the JPEG image it produced. Applying various raw extraction techniques might allow you to recover the missing information.


Finally, you can use an incident light meter. This measures the light arriving on the subject instead of the light reflected back to it (which a camera meter measures). They tend to be expensive, but everybody I have met who uses one swears by them.

Conclusion

Your camera’s meter tries to make everything have the same level of brightness. If you want to get a proper exposure, you need to be aware of this and take steps to get it. Solutions to the problem include exposure compensation controls, manual metering and planning of the exposure, or getting extra data from the RAW file.

Black and White Backdrops

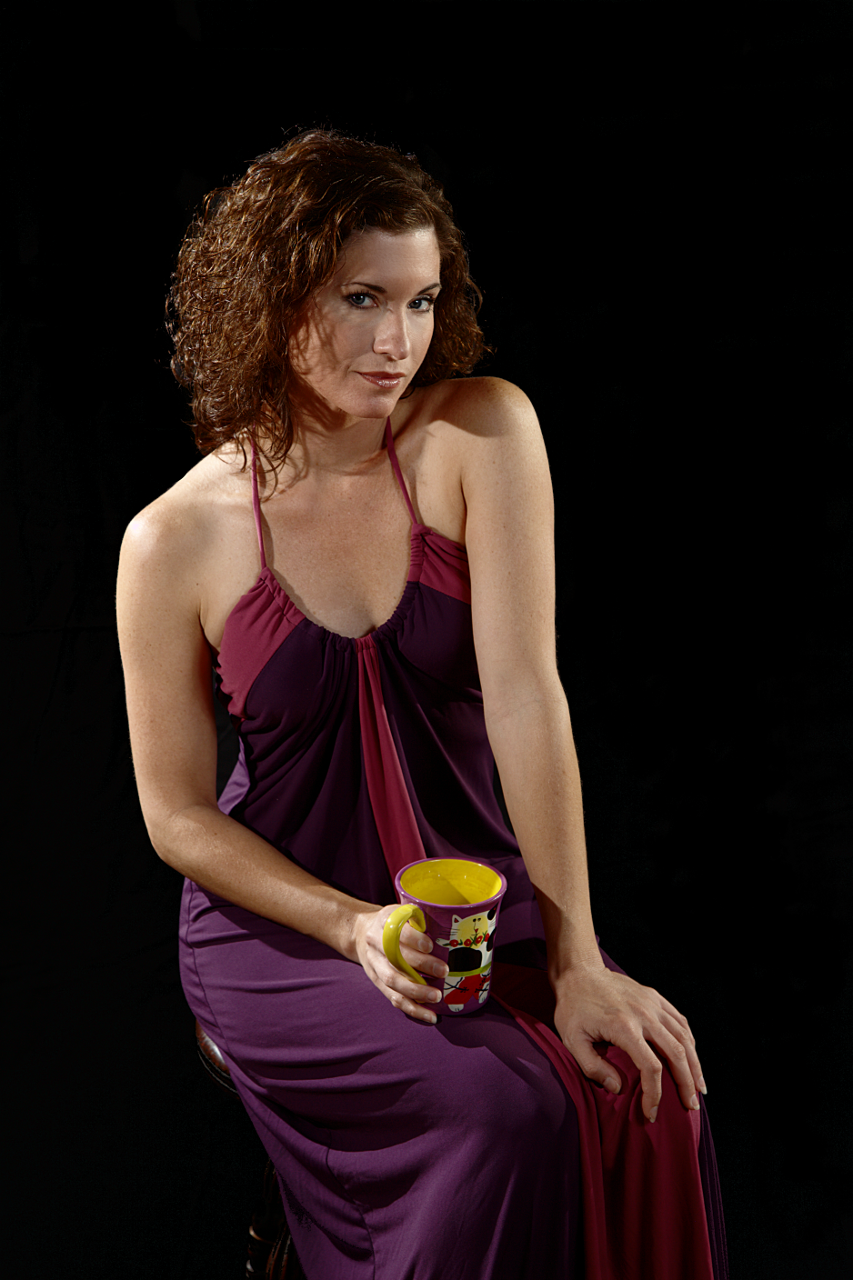
Recently I shot Candace Nirvana. This was a chance to try out my new backdrops, fixing problems with my earlier backdrops. The backdrops were commercial ones, purchased from the Backdrop Outlet. I tried both black and white ones.

Both worked far better than the muslin I had tried earlier. I could get the black one to go completely black, and the white to be completely burned out. These were good improvements.

Black background behind a woman in purple dress holding a coffee cup
Candace in front of a black backdrop
The black backdrop really makes your eye go to the lighter parts of the image. In the example here, this is her skin. In general, when an image contains a face, your eyes naturally seek out the eyes. With a black backdrop, this effect seems to be enhanced.

I did have to ensure that I had a hair light from above and behind to make sure that her hair was separated from the backdrop. Dark hair on a light-skinned model makes for more of challenge due to the contrast. Add to this the need to not lose the hair in the background, and the lighting is not trivial.

For this image, there are four lights: The primary lights are a “softbox” created by placing a diffuser in front of a flash that is left and forward of her, and an umbrella forward, right, and above her. The secondary lights are two hair lights above and behind her on the left and right. Each light that is added is one more that has to be balanced with all the others, so the complexity is higher than I would have liked. Also, in spite of all of the lights and softeners, I still had harder shadows than I would have liked. For example, look at her hair shadows on the right side of her face (her right).

Another point I learned was that I really need to be able to mount lights on the crossbar of the backdrop holder. Then, I could have used a single light with a grid as a hair light.

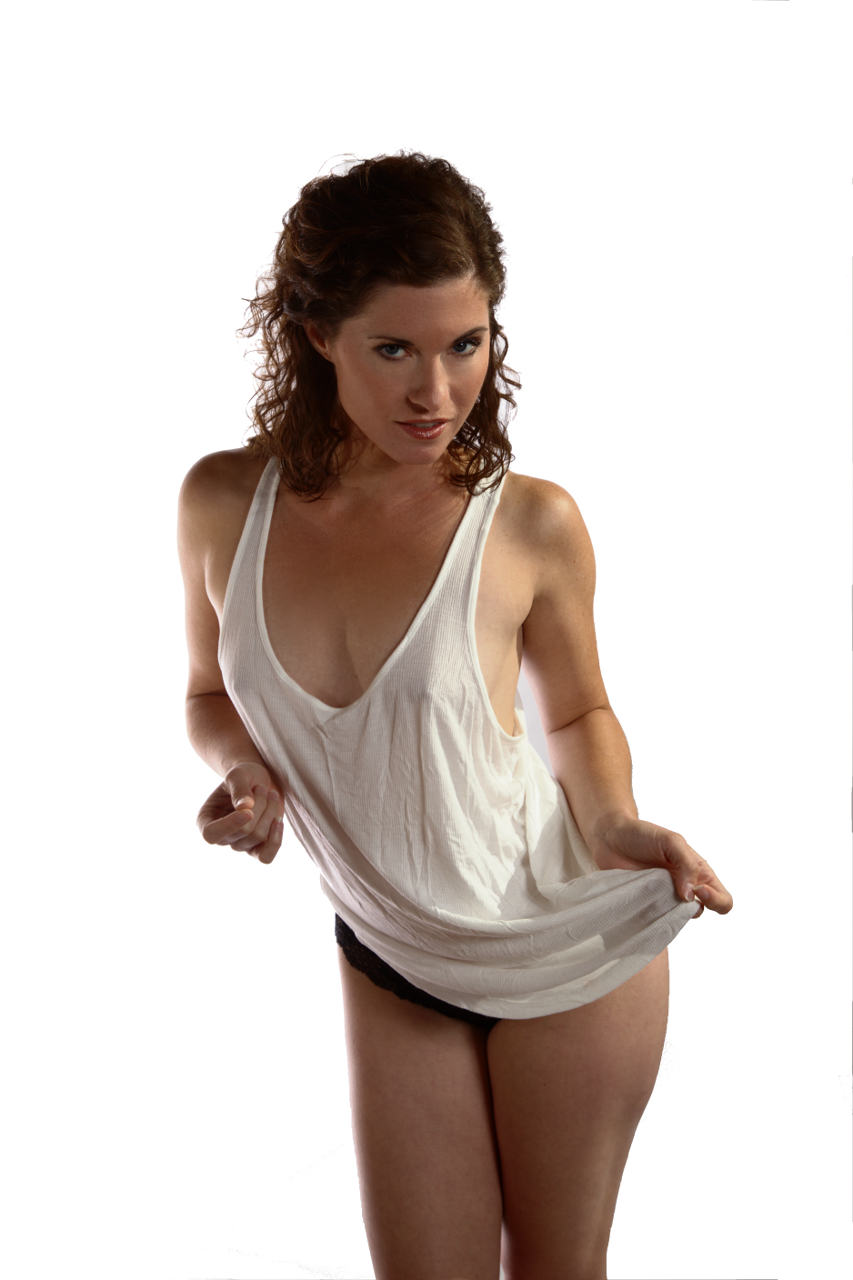
Woman with white shirt in front of a white backdrop
Candace in front of a white backdrop

I also worked with my white backdrop. If I lit it, I could burn it out, creating a solid white background, which makes darker hair easy to work with. However, I was getting a lot of reflected light from the backdrop onto her skin, which was a different challenge. I could have moved her forward, but the backdrop only came so far (I should have invested in the larger one…). For photos like this one, it would have been an acceptable solution, because I was not showing her feet.

A white shirt and a white backdrop makes for a challenge when trying to avoid burning out the shirt while doing just that with the backdrop.

Lighting the backdrop with fewer reflections onto the model would have been easier with barn doors or something similar on the backdrop lights.

One final issue was wrinkles. Both the black and the white backdrops had wrinkles in them from being folded. They did show up in the pictures, which makes more work for me since I want a smooth background. Both of the images on this page had visible wrinkles that I took out. Next time, I’ll try dampening them and putting them in a cool dryer to see if that helps. I guess I could break out a iron as well. Anybody have other ideas?

Soft Light

Soft light comes from a diffuse source. The classic example is an overcast day, where the light comes from everywhere and there are few, if any shadows. Other examples of soft light include studio softboxes, diffusers, and reflected light from a large surface (e.g., a ceiling). All of these need to be near the subject, otherwise they begin to act more like hard light…move an umbrella reflector away from the subject and the light becomes harder.

Shadows on an object lit with soft light have a less-defined edge, and they are not as dark. Because it does not highlight blemishes, scars, and wrinkles, soft light tends to be more flattering for people. For this reason, portraits normally use soft light, as do some glamor shots.

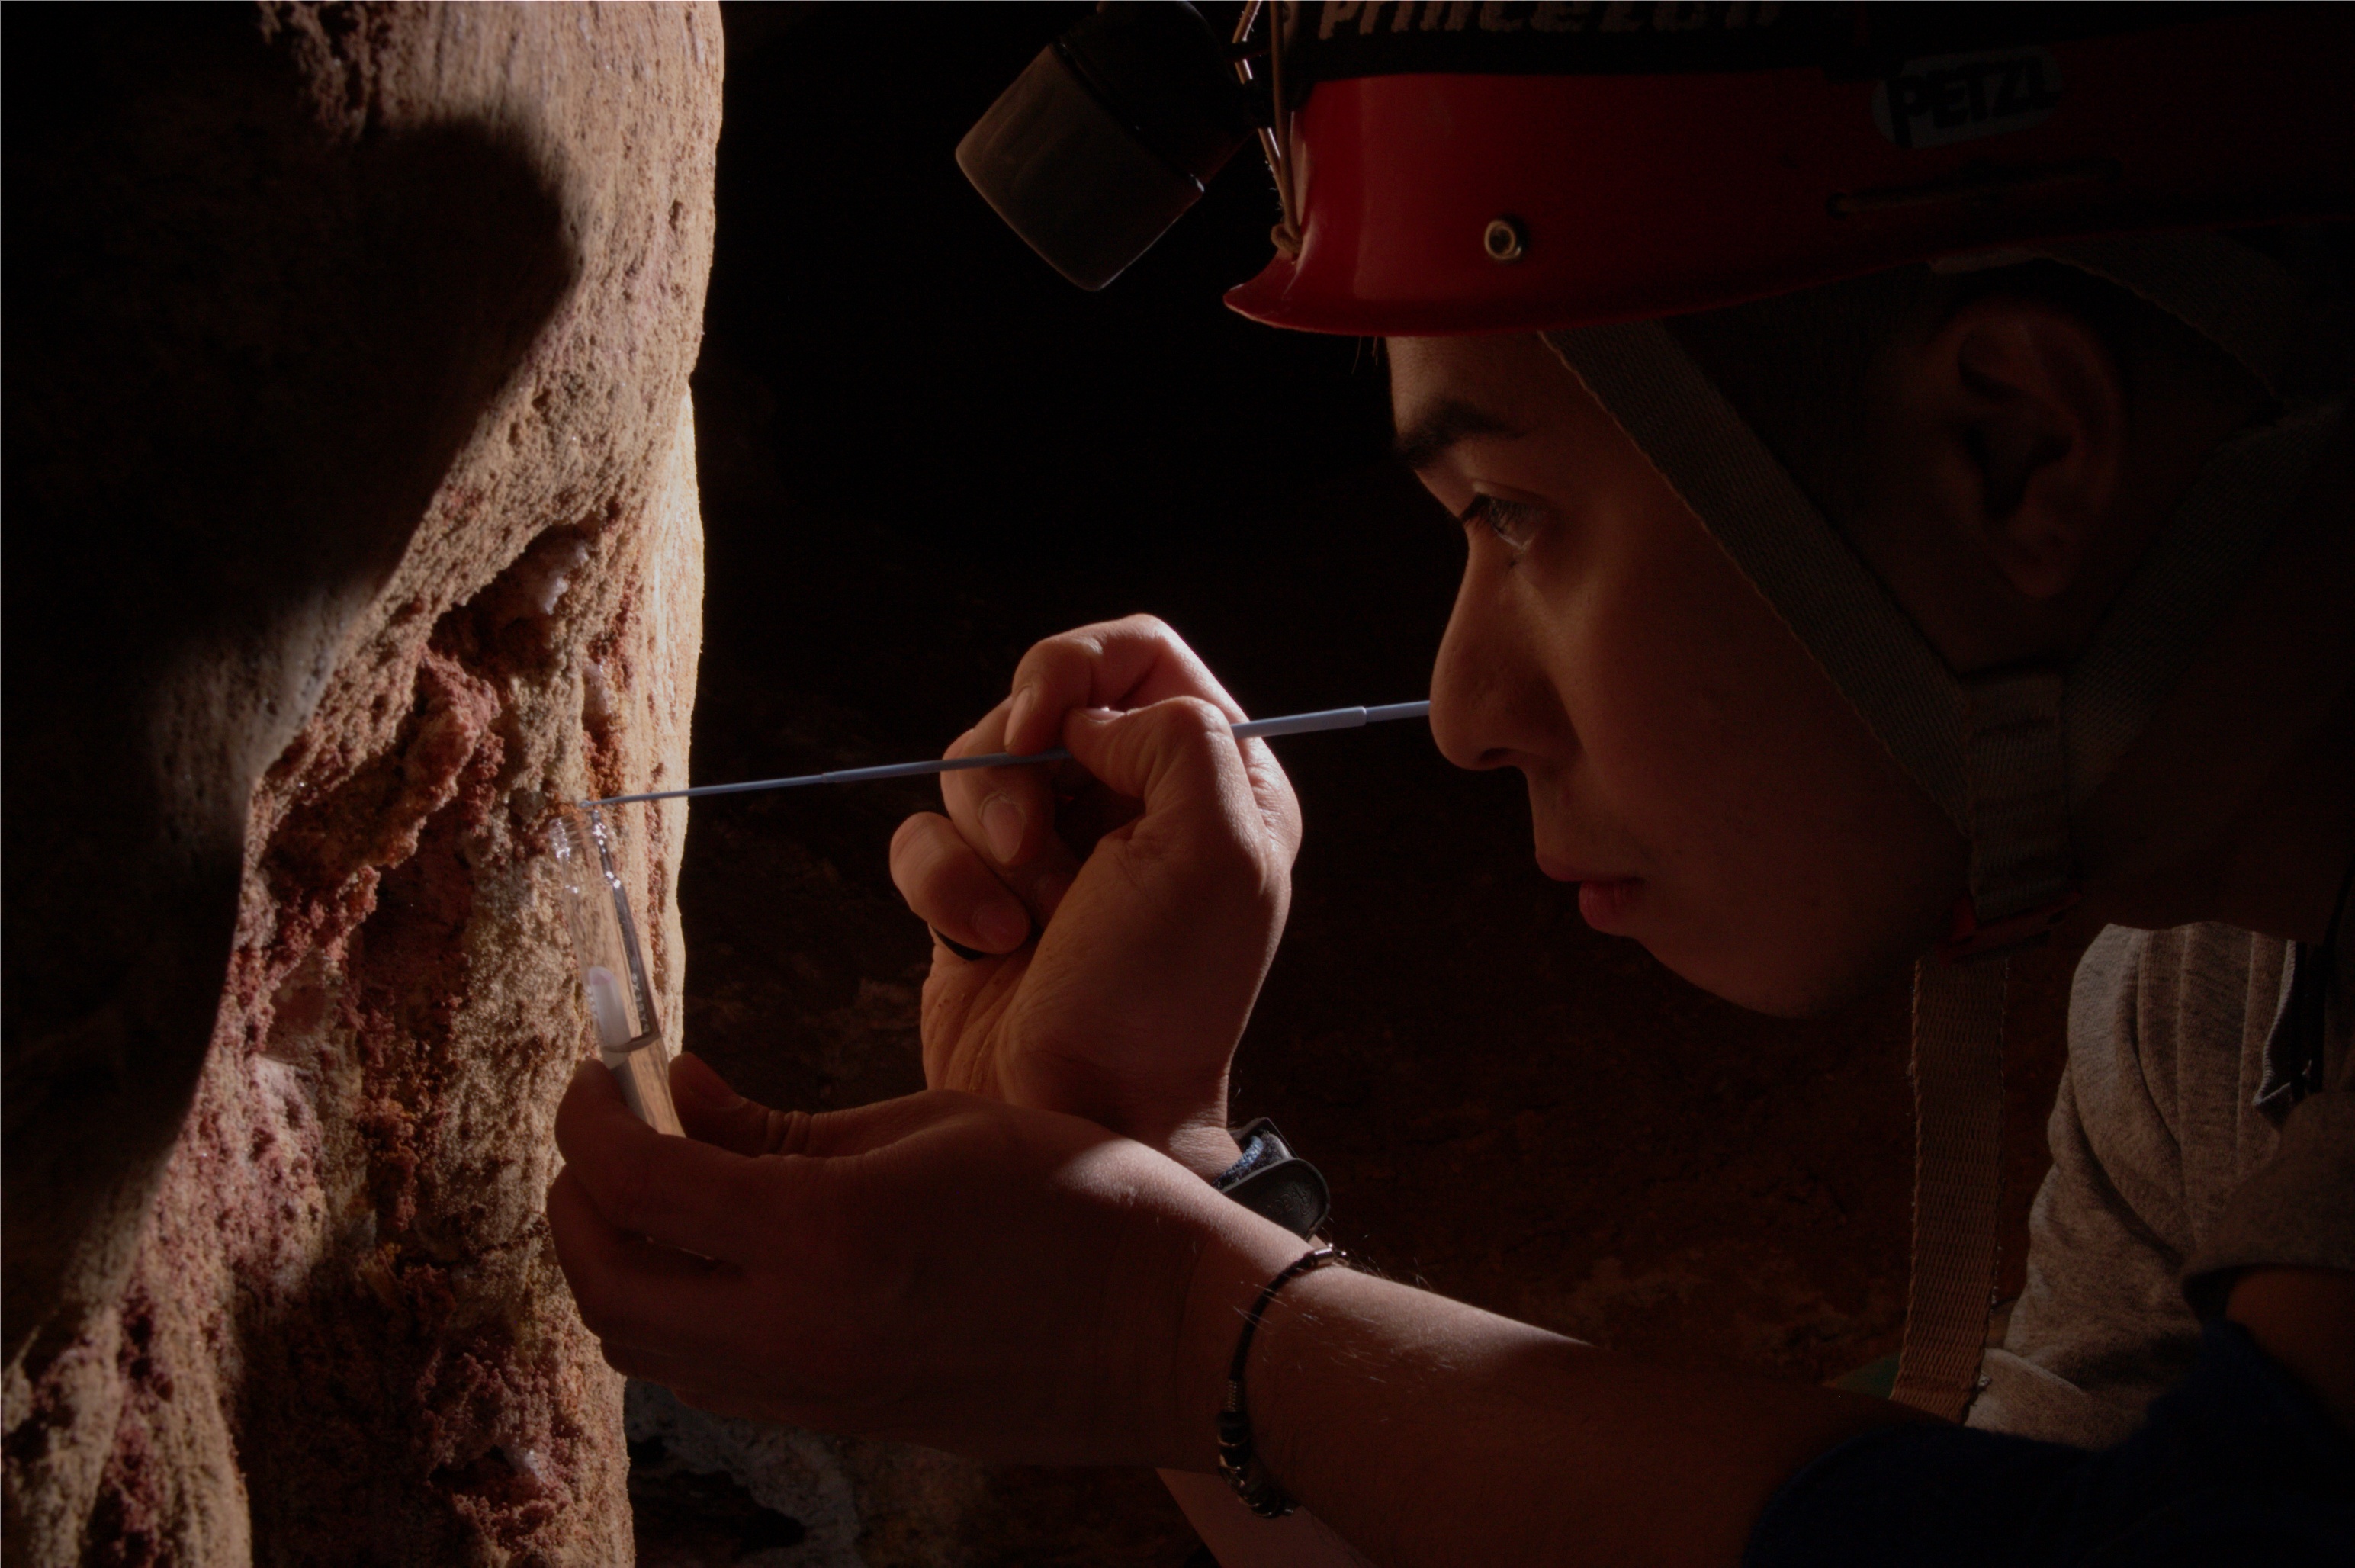
Here is one of my favorite soft-light shots illustrating this type of lighting.

The light on his face is bounced from the rock he is looking at, creating a light source that is effectively as large as the lit area of the rock.

This is the second in a series of blog entries about hard and soft lighting. The previous entry is Hard Light.

Hard Light

I am not the first to write about the distinction between hard and soft light. However, I recently prepared (and gave) a talk for the 2011 National Speleological Society (NSS) convention, and I learned a bit in doing the preparation for the talk. The results for this will be spread across a few blog entries to keep each one tight and on a specific topic. As I finish them, I will link them all together.

First, definitions. Hard light is light that has sharp edges to the shadows. It comes from a small light source or a large one far from the subject. Most speedlite/speedlight flash units are relatively small light sources. The sun is large, but it is far away, so it also is a hard light source, especially near noon.

Hard light is good for showing textures and fine details. This is great for photos like geological features, but few people want every last blemish and wrinkle highlighted in the photo unless it is to show character as in this example.

high-contrast image of cave pearls lit by a single hard light source
Note the texture, sharp shadow lines , and deep shadows in this high-contrast image.

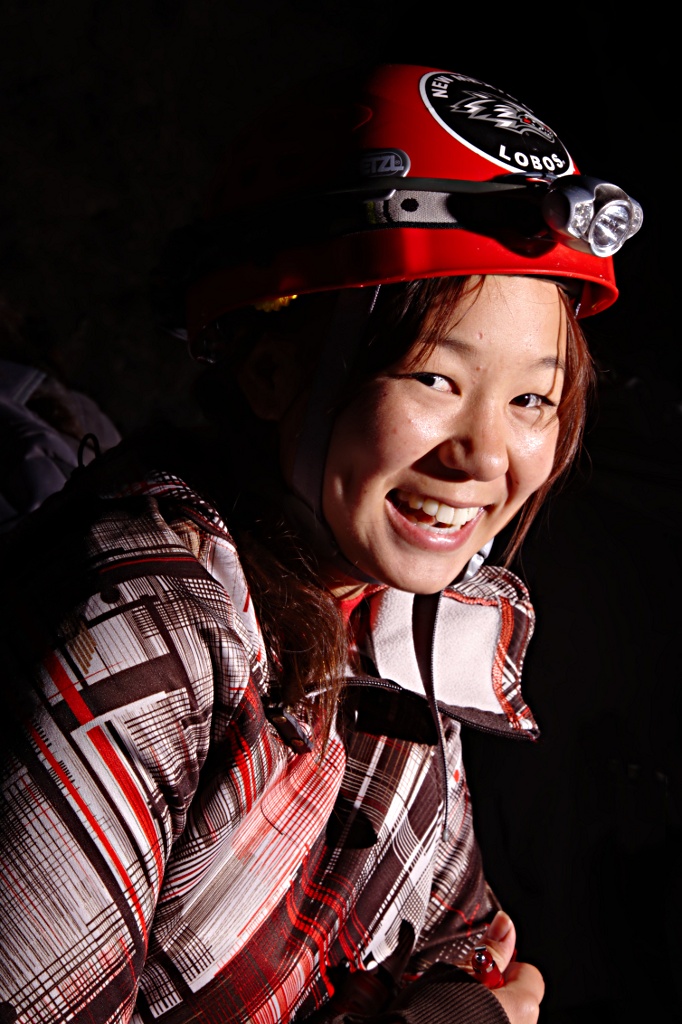
Young people, such as this lovely young woman, can also take hard light because they have great skin.

Her skin is good enough that the hard light is not a problem; she has no blemishes or wrinkles.

Shadows in hard light tend to be dark with few details. The high contrast can create a moody image that can be dramatic. Film noir movies are classic examples of this type of lighting.

You can also soften hard light by using a second (and possibly more) light source. If you have no modification devices that soften the light, this approach alone might be sufficient. Position the extra light(s) so they fill the deep shadows. I normally set the second light to be about a stop darker than the primary light, but the exact ratio depends on the situation.

Cave formations lit by two light sources, the second filling in the shadows of the first
The primary light is a hard light to the upper left. A second light to the right fills in most of the shadows with a lower light level.

To summarize this blog entry, hard light comes from a small light source and produces high-contrast images with dark, well-defined shadows. Sometimes, it is exactly what you need to set the mood of an image.